Uses of the Treasury Payment Program
People familiar with SAP applications are often familiar with the Accounts Payable (AP) payment program, but not everyone is familiar with the Treasury payment program, although there are features of the Treasury payment program that most companies could use to improve their processes in an SAP system. The Treasury payment program offers a very controlled, best practice process for treasury departments to follow.
Whereas the AP payment program pays AP and accounts receivable (AR) invoices, the Treasury payment program pays payment requests. Payment requests are open items made to the Payment Request Clearing Account, which is a suspense account configured to track Treasury payments. The same Payment Request Clearing Account number should be used across all company codes.
An obvious advantage of using the Treasury payment program is that the accounting entries for Treasury payments are made by the SAP system before the payment is executed at the bank, which is a more controlled and compliance-friendly process. Another advantage is the straight-through processing of the payment, meaning the payment details, such as the routing number and account number, are entered just once and flow through the SAP system before being sent to the banks. A third advantage is to have the system enforce strict controls around Treasury payments.
There are seven types of payments that could be run through the Treasury payment program (F111). They are:
- Bank-to-bank transfers
- Free form payments
- Business partner repetitive code payments
- Trade-related payments
- In-house cash (IHC) payments
- Loans Management (FS CML) payments
- Payments to customers and vendors
(Note: When you are making payments to customers and vendors using the Treasury payment program, the customer and vendor bank details are used, but the open invoice is not cleared.)
The IHC payments, payments to customers and vendors using the Treasury payment program, and Loans Management modules are not as frequently used as the other types of payments listed above.
(Note: The functionality described in this article is included in SAP ERP Central Component [SAP ECC], although licensing may be required to use the SAP Treasury and Risk Management module. SAP’s Transaction Manager module tracks Treasury trades through their full life cycle: from trade entry to payments to month-end processing to maturity of the trades. All accounting entries related to the trades are triggered by the trades and are posted directly to the SAP General Ledger. The article also mentions aspects of the SAP Bank Communication Management module, which may also require additional licensing.)
Creating Payment Requests
Repetitive Payments
Repetitive payments are bank-to-bank transfers or payments to a business partner that take place regularly using the same set of payment instructions. There are two types of repetitive payments in the SAP system: bank-to-bank transfers and business partner repetitive. The SAP system uses repetitive codes to process repetitive payments. A repetitive code in the SAP system is a 20-character key that designates a set of payment standing instructions that do not and cannot be changed ad hoc. This includes the sender bank, sender account, recipient bank, recipient account, payment method, and currency. The only details that can be changed when the payment is made are the payment amount, value date, and reference text. There are multiple advantages gained by using repetitive codes in the SAP system. Some of the advantages include increased security, faster entry, and risk mitigation against user error.
Bank-to-Bank Transfers
The most common type of repetitive payment is the bank-to-bank transfer. Bank-to-bank transfers are used to make repetitive payments from one house bank account to another. Both accounts must be defined in the SAP system as house bank accounts. Keep in mind that when the two accounts are in different company codes, this type of repetitive payment creates an intercompany posting document (the payment posting posts to the intercompany due to /due from accounts) posting. (Bank-to-bank transfers can be done between any two accounts as long as the FI configuration has enabled cross-company code postings between the two entities.)
Business Partner Repetitive
Business partner repetitive are repetitive payments made from a house bank account to a business partner bank account.
Before you can execute a bank-to-bank repetitive code or business partner payment, you need to create a repetitive code template. The repetitive code template defines details of the payment that will be executed. The two aspects of the payment that are not included in the repetitive code template are the amount and the value date.
Both bank-to-bank repetitive code and business partner repetitive code templates are created using the Edit Repetitive Codes program (transaction code OT81). After you execute transaction code OT81 or follow menu path Accounting > Financial Accounting > Banks > Master Data > Repetitive codes > Repetitive Codes, the Edit Repetitive Codes screen appears (Figure 1). To create the repetitive code template, enter a value for the sending company code in the Paying CoCd (paying company code) field and enter the name of the house bank in the House bank field.

Figure 1
Create a repetitive code template
Click the create icon  to create a repetitive code template.
The system then displays the pop-up screen shown in Figure 2. To create a business partner repetitive template, select the Central Business Partner radio button. To create a bank-to-bank repetitive code template select the Bank radio button.
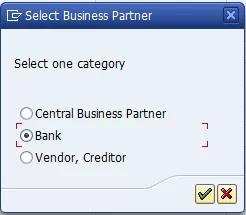
Figure 2
Select the type of repetitive code template
For this example, select the Bank radio button and then click the enter icon  . This action displays the screen in Figure 3.
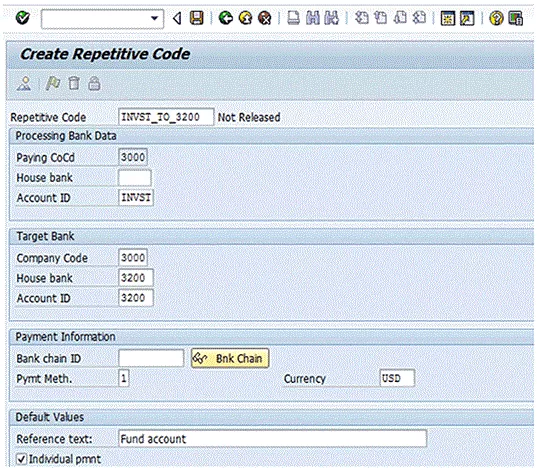
Figure 3
Define a bank-to-bank repetitive code template
In the Repetitive Code field at the top of the screen, enter a name (up to 20 characters) for the repetitive code template. In the Processing Bank Data section, enter details for the house bank account from which the funds will be sent when the repetitive code payment is executed. In the Target Bank section, enter details for the house bank account to which the funds will be sent. In the Bank chain ID field, you can specify an intermediary bank. Enter the payment method and currency of the payment. In the Reference text: field, enter the reference information that should be sent along with the payment. This text typically describes the payment. The Individual pmnt (individual payment) indicator should be selected if you do not want the payment to net with any other payment when you run the Treasury payment program. By selecting the Individual pmnt indicator, the payment is sent as an individual payment.
(Note: When the Treasury payment program is run, it nets payments that have the same value date, source house bank account, target house bank account, payment method, and currency, and that do not have the Individual pmnt indicator set.)]
After you enter the details for the bank-to-bank repetitive code template, click the save icon  . This action displays a pop-up screen similar to the one in Figure 4. Click the enter icon.
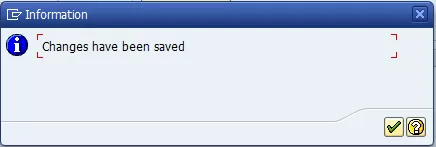
Figure 4
Save the bank-to-bank repetitive code template
At this point, you have defined the repetitive code template, but you cannot use it yet. Before you can use it to execute a payment, you must release it. To release the repetitive code template, open the Edit Repetitive Codes screen (see the instructions before Figure 1), select the tab to the left of the repetitive code as shown in Figure 5, and click the release icon  .
.
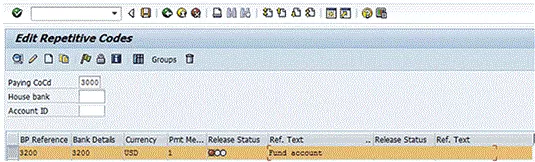
Figure 5
Release the repetitive code template
This action displays the pop-up screen shown in Figure 6. Click the enter icon and then click the save icon (Figure 5) to save the release.
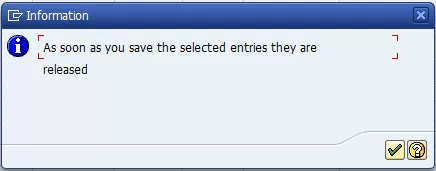
Figure 6
Save the release
The Release Status for the repetitive code template now is green, indicating it is available to be used to execute a payment (Figure 7).
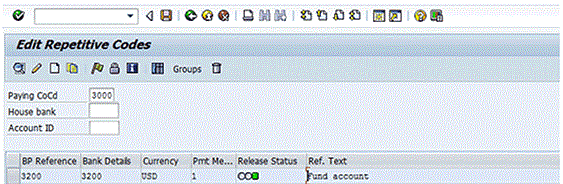
Figure 7
Released bank-to-bank repetitive code template
To execute a bank-to-bank repetitive code payment, go to the Fast Entry with Repetitive Codes (Bank-to-Bank Transfer) program (transaction code FRFT_B), follow menu path Accounting > Financial Accounting > Banks > Outgoings > Payments with Repetitive Code > Carry Forward Bank Accounts, and press Enter. (There are no required fields when running this program.) This action displays the screen in Figure 8.

Figure 8
Execute a bank-to-bank payment
Enter the amount of the payment in the field under the Amount paid column. The reference text defaults from the repetitive code definition, but can be changed here. Click the Create Payment Request button to create the payment request. A message showing the payment request number is displayed in the next screen (Figure 9).
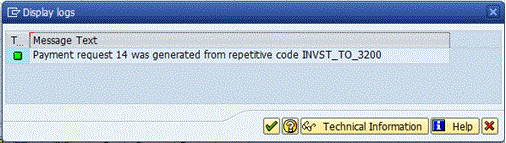
Figure 9
Payment request generated
At this point, the payment request is unreleased. If you run the Treasury payment program at this point, the system would not pay the payment request created above because the payment request has not been released. To release the payment request, you need to select the payment request in the lower window then click the Release button at the bottom of the screen, as shown in Figure 10.

Figure 10
Release the payment request
After you click the Release button, the system displays a message similar to the one in Figure 11. Click the enter icon to display the screen shown in Figure 12. At this point, the Treasury payment program can be run.
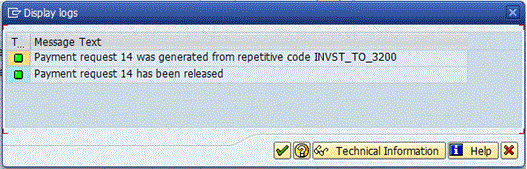
Figure 11
Payment request has been released.
At this point, the payment request’s status is released, as shown in Figure 12.
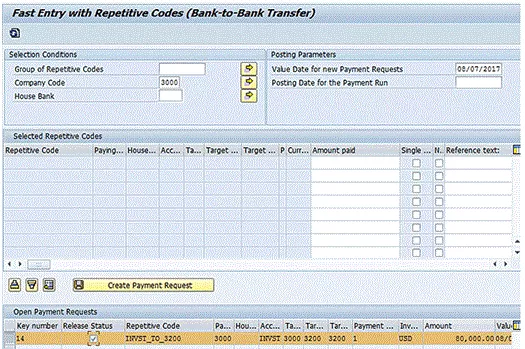
Figure 12
Payment request Release Status is updated
(Note: The steps for executing a business partner repetitive code template are the same as when executing a bank-to-bank repetitive payment except that the Fast Entry with Repetitive Codes (Treasury Partner) program (transaction code FRFT_TR) is used. Transaction code FRFT_TR can be found by following SAP menu path Accounting > Financial Accounting > Banks > Outgoings > Payments with Repetitive Code > Payments to Business Partners.)
Free Form Payments
Before moving on to the steps to execute the Treasury payment program, I first describe the steps to execute a free form payment.
A treasury department needs to be able to make urgent payments on an as-needed basis. The SAP system provides this functionality with the free form payments transaction. Treasury staff can make payments from any bank account in any company code configured in the system to any external bank account. These payments, including the bank details, are keyed in manually by a treasury user.
To execute a free form payment, run the Online Payment program found under Accounting > Financial Supply Chain Management > Cash and Liquidity Management > Planning > Generate Payment Request > Using USA Control Program > Online Payment, or execute transaction code RVND. In the initial screen that the system opens, select the Free Form Payment button (not shown). This action displays the screen in Figure 13.
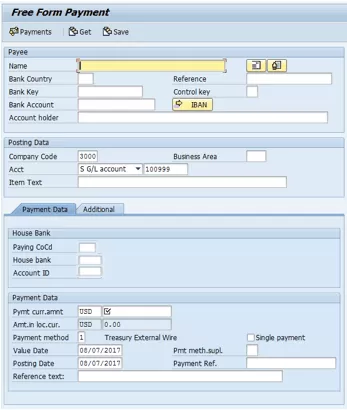
Figure 13
The Free Form Payment screen
Enter the information related to the payment, as shown in Figure 14. In the Payee section, enter the name and bank account information for the beneficiary of the payment. By clicking the address icon  , you can enter an address for the beneficiary (not shown). In the Posting Data section, the debit side of the posting is specified when generating the payment request. In the House Bank section of the Payment Data tab, specify the bank account to be used for payment, and in the Payment Data section, specify the amount and currency of the payment, the payment method, and the value date. In the Reference text: field, enter the reason for payment. This text is sent to the bank along with the payment. When you have entered all your data, click the Payments button. This action displays the screen in Figure 15.
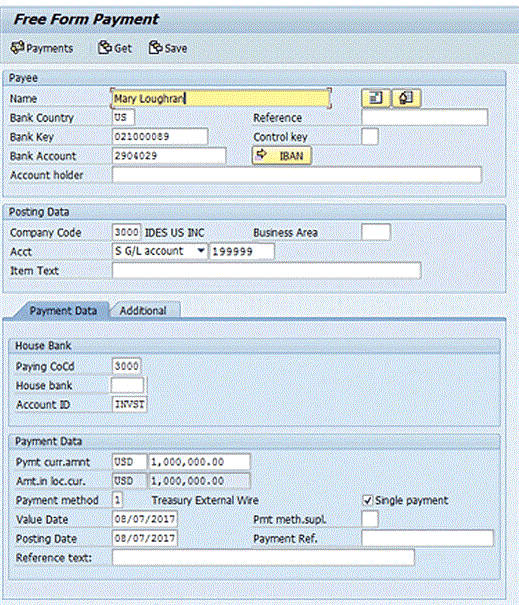
Figure 14
Enter details in the Free Form Payment screen
Figure 15 shows the payment request number created and the FI document number created. Click the enter icon (not shown).

Figure 15
Free form payment request created
Before a free form payment can be paid, a user with the authorization to release free form payments must release it. Approving the free form payment at this point is critical because the bank account details have been entered manually into the SAP system. To release the free form payment, execute transaction code F8REL. (This transaction code is not in the SAP menu.) This action opens the screen in Figure 16.
Figure 16
Release free form payments
Enter the known fields and click the execute icon  . This action displays a pop-up screen with a message (Figure 17).
(Note: With dual control, the user who initiated the payment is not able to release his or her own free form payment.)
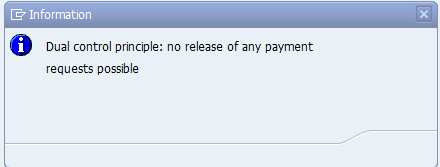
Figure 17
Dual control on free form payments
The bank details are entered in the Free Form Payment screen (transaction code RVND). Before a free form payment can be paid, it must be released by a user with the authorization to execute transaction code F8REL.
After the F8REL program runs, select the indicator to the left of the free form payment to be released, click the Prebook button, and then click the Payments button to release the payment (the screen in which you complete this step is not shown).
Trade-Related Payments
Treasury trade-related payments flow directly from the treasury trade to a payment request. No rekeying of the data is required. The bank account information is determined from the house bank accounts assigned to the trade and business partner data referenced in the trade creation process.
The SAP system supports the full life cycle of a trade in the Transaction Manager sub-module. All payments related to Treasury trades can be made straight through from the trade, through the Treasury payment program and then to the bank. The bank accounts to which the funds will be sent or received for specific business partners are entered in business partner standing instructions and default into the trade at creation.
Table 1 summarizes the steps of an end-to-end Treasury payment process flow. The Monitor Batches and Payments report (BNK_MONI) gives centralized payment reporting and includes the statuses on the payment from importing the acknowledgement files into the SAP system.
| Step |
Transaction code, program, or how to run the process |
Description |
| Initiate Treasury payment request |
Free form payment (RVND), repetitive code payment (FRFT), post trade flows (TBB1) |
Treasury initiates the payment request. This can be done by initiating a free form payment or a bank-to-bank transfer or by posting a Treasury trade to the SAP General Ledger. |
| Treasury payment program |
Scheduled or manually executed (F111) |
The payment accounting documents are created in this step, but the payment file is not created. The payment file is not created until the payment processing and approval are successfully completed. |
| Merge payments |
Scheduled (FBPM1) |
(SAP Bank Communication Management)
Starts the process of merging payments. This step triggers the workflow approval messages. |
| Approve payments |
Approve Bank Payments (BNK_APP) |
(SAP Bank Communication Management) Payment file creation will be held until the payments are approved. The payment file is created upon approval of the payments. |
| Payment file is delivered to the bank |
N/A |
The payment file is created. The payment file is now transmitted to the bank. The status of the batch is now payment medium created. |
| File level acknowledgment |
N/A |
A file level acknowledgment file acknowledges the bank has the received payment file. The file level acknowledgment lets the company know the bank has received the payment, although it does not confirm that the payments within the payment file will all pass through the payment system correctly. (It would be the transaction- level acknowledgment that tells the company the payment transactions have been successfully processed at the bank.) |
| Transaction level acknowledgment |
N/A |
The transaction level acknowledgment file provides successful or rejected acknowledgment at the payment level. |
Table 1
End-to-end process flow for Treasury payments with SAP Bank Communication Management
Running the Treasury Payment Program
The steps to running the Treasury payment program are the same as the steps for running the AP payment program (Table 2).
| Step |
Description |
| Enter parameters |
This is where users tell the SAP system what they want to pay. |
| Proposal run |
This is where the SAP system tells the user what payments will be
made based on the parameters entered. |
| Payment run |
In this step, postings for the payment are made to the SAP General Ledger. |
| Create payment medium |
Create a payment file. |
Table 2
Steps to run the Treasury payment program
As with the AP payment program, there are roughly four steps to running the Treasury payment program. The first step is entering the parameters, which entails specifying which payment requests the user wants to pay. After you enter the parameters, you execute the proposal run. In the proposal run, the SAP system informs the user what payment requests, based on the parameters entered, will be paid. In the third, and typically final step, both the accounting entries are made and the payment medium is created. (These final two steps can be made separately or together.) The payment medium is the payment file, such as an XML formatted file, that would be transferred to the bank.
(Note: If you are using the SAP Bank Communication Management module for payment approvals, the payment file creation will be held until the payments are approved.)
Like the AP payment program, the Treasury payment program can be run only for legal entities in the same country. (To determine the country of a legal entity, check the T001 table.) This can be an issue for global companies with a centralized Treasury department because the payment program may need to be run multiple times. To get around having to execute many different payment runs when the company codes are in many different countries, the payment programs can be scheduled once the treasury department is comfortable with the process.
To execute the Treasury payment program, follow menu path Accounting > Financial Supply Chain Management > Cash and Liquidity Management > Cash Management > Planning > Payment Program > Payment Requests, or execute transaction code F111. The system then displays a screen similar to the one in Figure 18. Enter the current date in the Run Date field, and a unique identifier for the payment run in the Identification field. It is best to follow a consistent naming convention for the Identification field so that when you are looking through executed payment runs, it is clear by the Identification field what is included in the payment run.
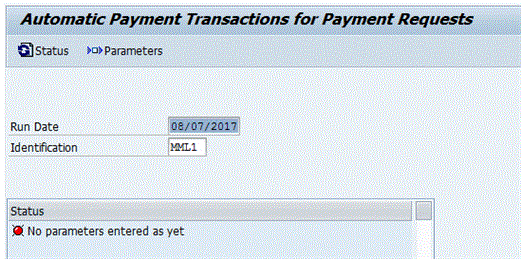
Figure 18
Treasury payment program input screen
The first step is to enter the parameters. This is done by clicking the Parameters button. This action opens the screen in Figure 19.
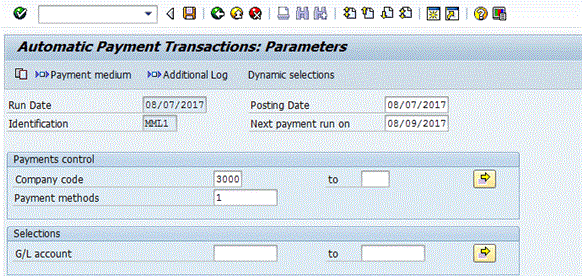
Figure 19
Enter details in the Parameters screen
The date entered in the Posting Date field drives the posting date of the FI document created by the payment program. The Next payment run on date should be set to the date when the Treasury payment program will be run next. This information drives the payment requests picked up by the payment run in that any payment request that is due before the next payment run date is included (assuming the other inputs also include the payment request). Enter the company code and Treasury payment method, which is typically a wire transfer. (The number 1 is the Treasury wire payment method in the SAP system I am using.)
After you click the Additional Log button, you can specify the maximum logging of messages in the payment log files. To see the maximum logging, which is most helpful when diagnosing an issue, use the settings shown in Figure 20.
- Select Payment method selection in all cases
- Select Line items of the payment documents
- Select Due date check
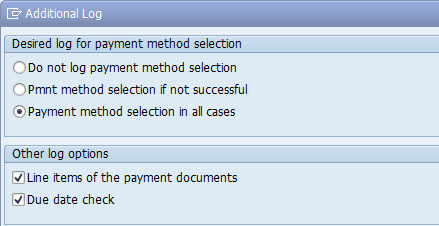
Figure 20
Additional log settings
After you click the enter icon (not shown in Figure 20), the message log created for all accounts is displayed (this screen is not shown). This message indicates that logging will be tracked on all payments.
After you click the Dynamic Selections button (see Figure 19), you can specify the specific payment requests that should be selected in the screen the system displays (Figure 21). For my example, enter the bank-to-bank repetitive code payment request number because this is the only payment request you want to pay for illustration purposes. The Key number is the payment request number. Notice that it is possible to filter on many of the payment fields, if required. This is shown in Figure 21.
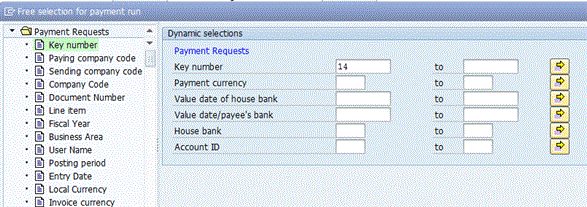
Figure 21
Enter dynamic selections to filter on specific payments
Click the save icon on the Dynamic selections pop-up screen (not shown). And then click the save icon in the define parameters screen (not shown) to save the parameters entered.
You are then taken to the screen in Figure 22 that includes a message in the Status section indicating that the parameters for the payment run have been entered.
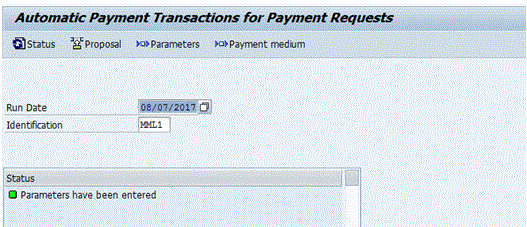
Figure 22
Parameters have been entered
The next step is to run the proposal run. The proposal run tells you what payment requests will be paid based on the parameters entered. To start the proposal run, click the Proposal button in Figure 22.