SAP iDoc
In this tutorial we will discuss in detail, sap iDoc functionality, it’s uses, idoc configuration and customizing in SAP. We will discuss the below SAP iDoc topics
- What is an iDoc
- Configure Outbound iDoc in sap
- Create Logical System
- Create RFC destination
- Maintain Ports
- Create Partner Profile for outbound iDoc in sap
- Create Distribution model and filters in sap
- sap iDoc Segment filters
- Send full and delta load of Vendor master iDoc
- Display and Edit iDoc
-
Create Partner Profile for inbound iDoc
-
Test inbound iDoc in SAP
- Create Partner profile for outbound iDoc-Audit Confirmations
- Display and Edit iDoc
-
Create an Extended / Custom iDoc in SAP
- Test extended iDoc in SAP
Need for a sap iDoc
sap iDoc is used by companies running on SAP ERP to exchange data with other companies who could be their vendors, customers, banks, Non SAP application processing company data and than feeding it into it’s SAP ERP.
What is an Idoc in sap : IDoc is an SAP object ( A type of file format) that carries data of a business transaction from one system to another in the form of electronic message. IDoc is an acronym for Intermediate Document. The purpose of an IDoc is to transfer data or information from SAP to other systems, which could be SAP or Non SAP and vice versa.
iDoc is transferred from SAP to another SAP system using SAP’s ALE technology.

Outbound iDoc in sap
An outbound iDoc is triggered in SAP. From SAP it goes to middleware which could be EDI system or Muelsoft or any other middleware system. In case the receiving system is a non SAP system Middleware transform the iDoc into an XML / flat file and feeds it into the receiving system.
In case the other system is SAP iDoc is sent to other system through transactional RFC connection between the two SAP systems. We will discuss all these is details along with their set in SAP later in this article. E.g. of outbound iDoc could be sent customer master data from SAP to other applications, Vendor master data, Material master data etc.
Inbound iDoc in sap
This iDoc is generated outside of receiving SAP system. Middleware system like EDI / Mulesoft receive the inbound data which could be in the flat file, xml format. This is than transformed into iDoc format by the middleware system. This iDoc is than sent to receiving SAP system. SAP system process the iDoc and post documents in SAP

Configuring Outbound iDoc in SAP
SAP has different iDoc types for different purposes. Here we will configure Customer master outbound iDoc type. Below are some of the iDoc types:
| iDoc Purpose | iDoc Type |
| Send Customer master data | DEBMAS |
| Send Vendor Master data | CREMAS |
| Send Material master data | MATMAS |
Below steps are involved in setting up outbound iDoc in SAP
- Create Logical System
- Create RFC Destination
- Allocate Logical System to Client
- Maintain Ports
- Create Partner Profile
- Create Distribution Model and Filter
- iDoc Segment Filtering
- Enable Change Pointer
- Enable Change pointer for specific message type
- Create iDoc from change pointer
- Send full customer master data through iDoc
Create Logical System in Sending System
A 'logical system' is used to identify an individual client in a system, for ALE communication between SAP systems.
Login to Client 105 (SENDER SYSTEM)
Transaction code : BD54
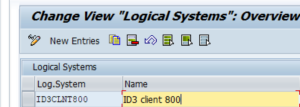
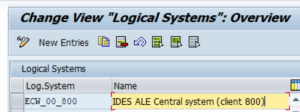
Create Logical Systems with naming convention 'system name'+'CLNT'+client no . E.g: ECW_00_800
Create Logical Systems with naming convention 'system name'+'CLNT'+client no ex: example for receiving system e.g.: ID3CLNT800
Save and come back
Receiving Logical system
Sending Logical System
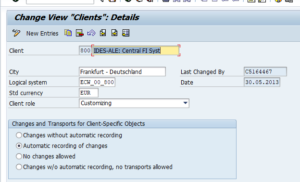
Log on to SAP system, client 105
Transaction : SALE – Logical System – Assign Logical System to client
Assign client 800 to Logical system ECW_00_800
Create Logical System in Receiving System
Login to Client 800 (RECEIVING SYSTEM)
Transaction code : BD54
Create Logical Systems with naming convention 'system name'+'CLNT'+client no ex: example for receiving system e.g.: ID3CLNT800
Save and come back
Assign Logical System to client in Receiving System
Log on to SAP system, client 800
Transaction : SALE – Logical System – Assign Logical System to client
Assign client 800 to Logical system ID3CLNT800
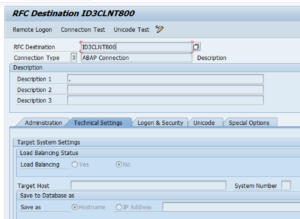
Create RFC Destination in sap
Transaction : SM59
The information about the target system of an RFC call is stored in the RFC destination. The attributes of destinations are defined statically and managed in AS ABAP using the transaction SM59. Every destination managed in transaction SM59 has a unique name that can be specified after the addition DESTINATION in RFC
Maintain Ports
Go to transaction WE21
Select folder Transactional RFC
Click create and select generate port name
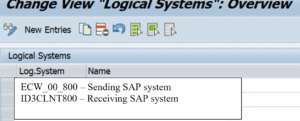
In the RFC destination field give the Receiving system (ID3CLNT800) created earlier in transaction BD54
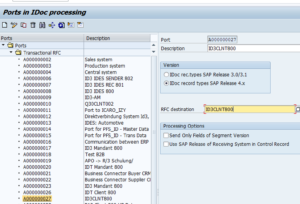
Please note an iDoc can be created in 3 formats
- Transactional RFC
- XML file
- Flat file
Transactional RFC : This for real time transfer of data from one SAP system to another SAP system
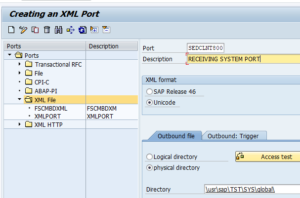
XML File : Here the iDoc is created in an XML file format. If XML file format iDoc is required select folder XML in transaction WE21 and then specify the receiving system port. In this we have to also specify a location in share point where the XML file will be delivered by the sending system. Receiving system will pick the file from the location specified here.
Flat file iDoc : Similar to XML file. Only difference it is txt file format
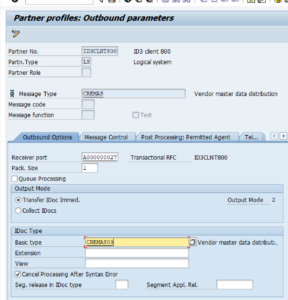
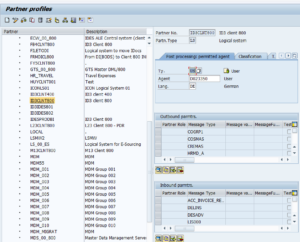
Create Partner Profile in sap
Transaction code - WE20
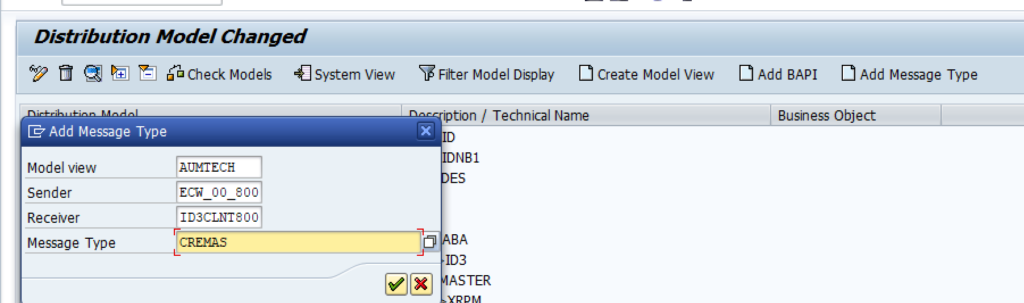
This has to be configured separately for different iDoc types. Here we will set it up for outbound iDoc type Vendor Master (CREMAS)
Select folder LS (Logical System) – Now click the create button
In the Partner Number field enter the receiving system created earlier
In the outbound Parameters click the plus sign

In the next screen enter iDoc message type CREMAS and other details as shown below
Create Distribution Model and Filters
Transaction Code : BD64
Click create model view. Give a name to your model, say AUMTECH, Save

Now select the model (AUMTECH) and click create message on header.
Enter the details as show below and save.
Adding Distribution Filters
Transaction code : BD64
Select the model created above. Now click on No filter Set as shown below.
Than click on create filter set. After that you can select specific fields as filter. For e.g. field company code can be used as a filter. It there are company code 100, 200, 300, 400 etc. and you select company code 100 in the filter. In that case vendor master data for company codes other than 100 only will be sent
iDoc Segment Filtering
Transaction code : BD56
An iDoc is made up of many segments. These segments are buckets which contain fields. Fields have the value. Below we list Vendor master iDoc (CREMAS) segments. Go to transaction WE19 and enter the iDoc message type. In this case CREMAS. Here you will be able to see all iDoc segments as shown below
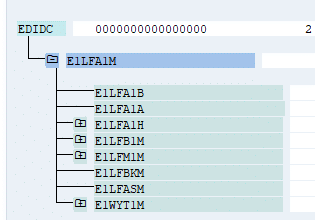
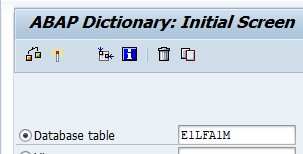
To see the fields in a segment enter the segment in SE11
iDoc-15
Another segment - E1LFBKM
This iDoc segment has vendor bank details. You may not want to send vendor details to other system. For this in transaction BD56 remove the idoc segments which should not sent
Enable change pointers
Transaction code : BD61
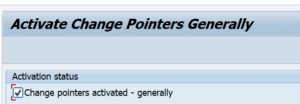
Change Pointers
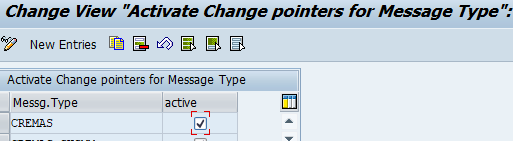
Enable Change Pointers for specific message type
Transaction code : BD50
As we are sending out Vendor master data through iDoc, message type is CREMAS. So enable change pointer for CREMAS
iDoc20
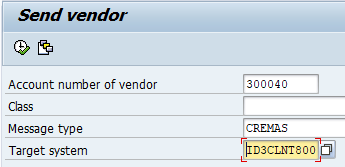
Transaction code : BD14
iDoc-21
Transaction code : BD21
iDoc-22

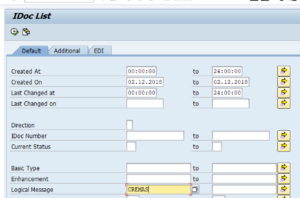
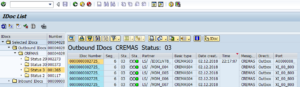
Display and Edit SAP iDoc
Transaction code : WE02
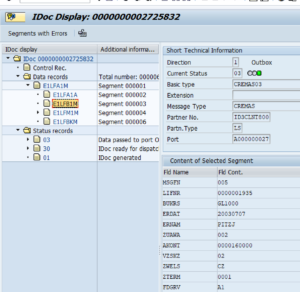
Let’s understand Vendor master iDoc. It has below segments. Segments are containers. Within each segments ae fields. For e.g. E1LFB1M has fields LIFNR (Vendor Number), BUKRS (Company code) etc.
iDoc type : CREMAS
| Segment | Fields | Fields Description | Sample Value |
| E1LFB1M – Segment for company code data for vendors | LIFNR | Vendor account number | 1935 |
| BUKRS | Company code | 1000 | |
| ERDAT | Date | 20030707 | |
| ERNAM | Person who created Vendor number | PITZJ | |
| ZUAWA | Sort Key | 002 | |
| AKONT | Reconciliation account | 0000160000 | |
| ZTERM | Payment Term | 0001 |
You can go to transaction SE11, enter iDoc segment and see all fields in the iDoc segment
SAP iDoc : Inbound
SAP inbound iDoc is generated outside of receiving SAP system. Middleware system like EDI / Mulesoft receive the inbound data which could be in the flat file, xml format. This is than transformed into iDoc format by the middleware system. This iDoc is than sent to receiving SAP system. SAP system process the iDoc and post documents in SAP

Configuring inbound iDoc in SAP
SAP has different iDoc types for different purposes. Here we will configure Customer master outbound iDoc type (DEBMAS). Below are some of the iDoc types:
| iDoc Purpose | iDoc Type | Message Type |
| Post Vendor Invoice | ACC_INVOICE_RECEIPT03 | ACC_INVOICE_RECEIPT |
| Post Customer Invoice | ACC_BILLING02 | ACC_BILLING |
| Acknowledgement iDoc | ALEAUD01 | ALEAUD |
Please refer to SAP Note #210137 for more details on above iDocs
Below steps are involved in setting up outbound iDoc in SAP
- Create Logical System in sap
- Create RFC Destination in sap
- Allocate Logical System to Client
- Maintain Ports
Above steps are common for both inbound and outbound sap iDocs. These have been covered in detail in SAP iDoc Tutorial 1
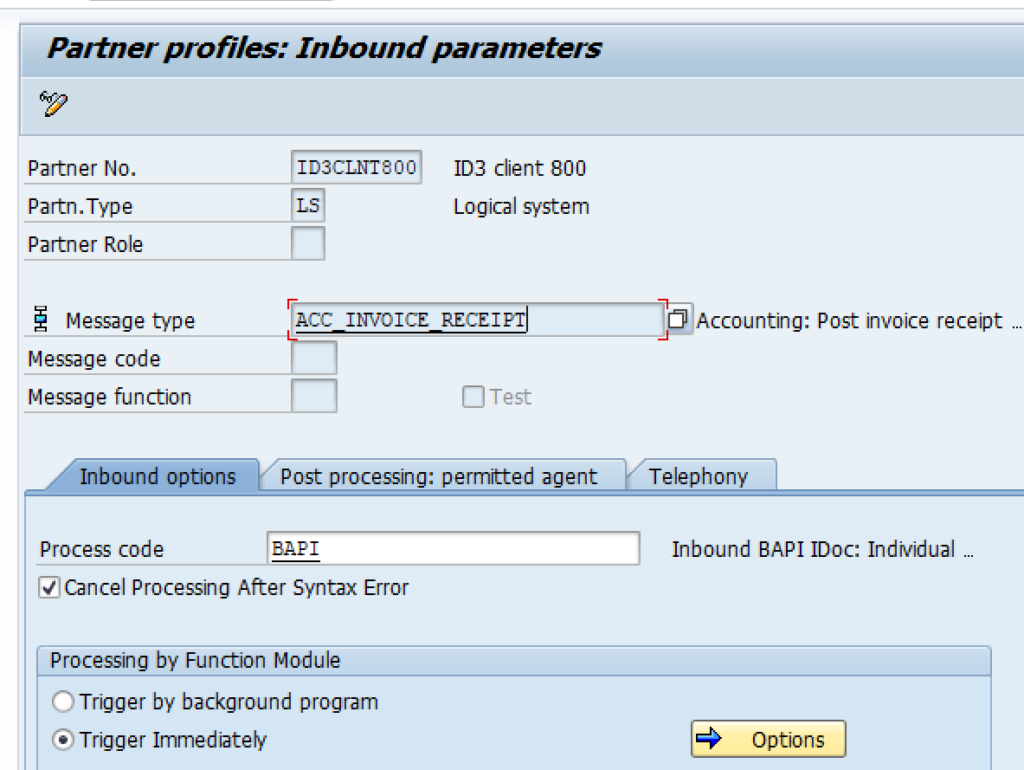
- Create Partner Profile in sap
Create Partner Profile in sap Transaction code : WE20
This has to be configured separately for different iDoc types. Here we will set it up for inbound iDoc type ACC_INVOICE_RECEIPT03 (Post Vendor Invoice)
Select folder LS (Logical System) – Now click the create button
In the Partner Number field enter the receiving system created earlier
In the inbound Parameters click the plus sign
In the next screen enter iDoc message type ACC_INVOICE_RECEIPT and other details as shown below
Test Inbound iDoc
We can use transaction code WE19 to test iDocs. Enter the details as shown below:
Transaction code : WE19
Used for testing iDoc
Enter the iDoc type or message type as shown below:
Now double click on segment EDIDC and enter sender and receiver data

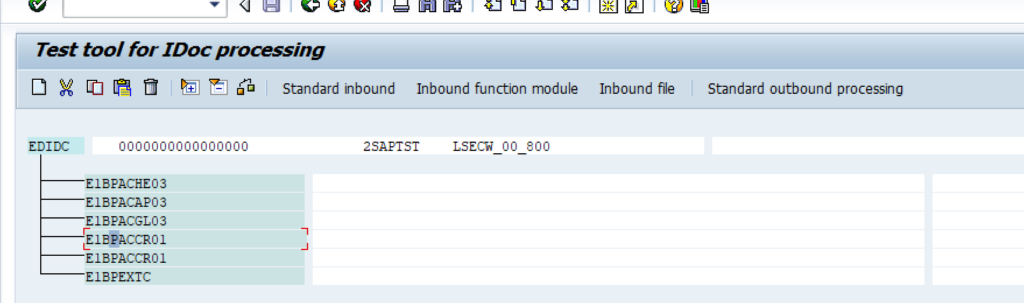
Enter data in Vendor Invoice header record segment #E1BPACHE03
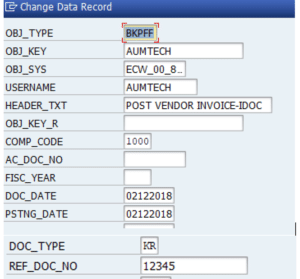
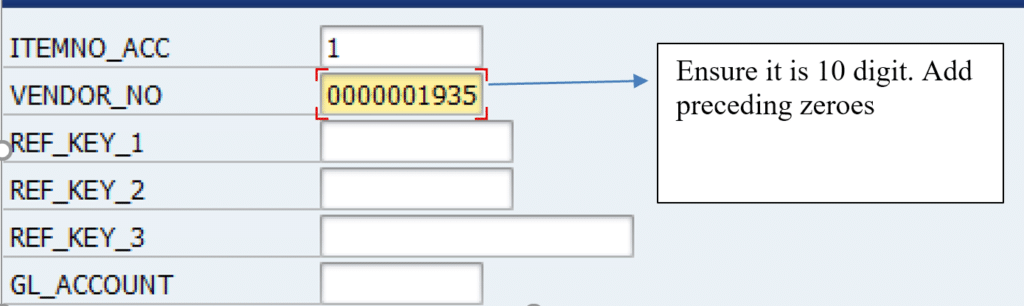
Enter data in Vendor Invoice Vendor Line item record segment #E1BPACAP03
iDoc-9
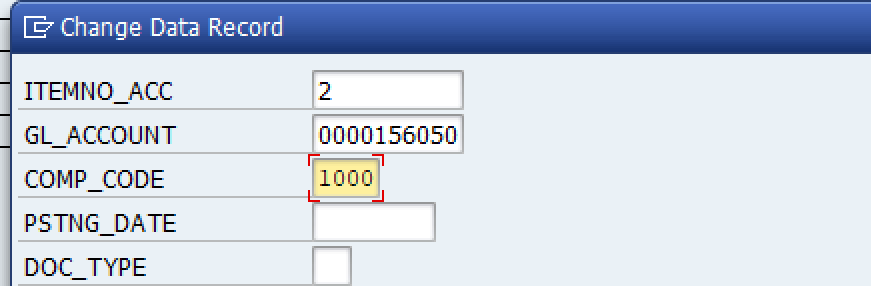
Enter data in Vendor Invoice GL Line item record segment # E1BPACGL03
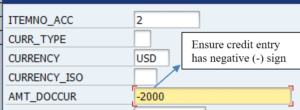
Enter amount for vendor line item, segment # E1BPACCR01
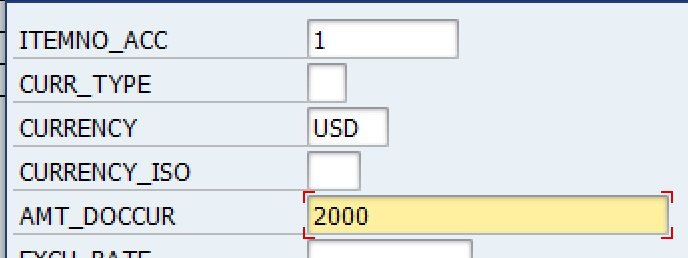
Enter amount for GL line item, segment # E1BPACCR01
Comments are closed.